How to Fix a Leaking Roof from the Inside: A Comprehensive Guide
How to fix a leaking roof from the inside? Maybe you are one of the homeowners who are wondering how to do it so. When your roof starts to leak, it’s more than just a nuisance—it’s a serious threat to the structure of your home.
Leaks can lead to serious damage, such as instigating mold and mildew growth, rotting the building structure, and encouraging bug infestations.
Perhaps you noticed an intrusive water stain on your ceiling, or maybe recurrent heavy rain has unmasked a problem you weren’t aware existed. Whatever the circumstance, a leaking roof is never a welcome sight.
The good news is that (if detected early), small leaks can often be fixed easily, avoiding further damage and costly repairs.
While this guide does not replace the expertise of a professional water damage and mold remediation company, it will assist you in taking immediate action when you encounter a leak, allowing you to mitigate damage before it spirals out of control.
How To Fix A Leaking Roof From The Inside – Identifying the Source
The first step in resolving any problem is identifying its root cause. Undoubtedly, small leaks are often difficult to spot and can often go unnoticed until they create visible damage in your ceiling or attic.
 Roof leaks typically present themselves in the form of water stains or spots on your ceiling and walls. However, at times, the location of the stain might not coincide directly with the roof leak.
This is because water travels along the path of least resistance, often using your home’s ceiling joists and walls as its freeway, to the lowest level where it accumulates and finally shows up on your ceiling.
Identifying Visible Sources
Commonly, one can spot water stains around the ceiling and the upper wall areas. However, since water tends to travel before it drips down noticeably, the visible stain may be quite a distance from the actual leak in your roof.
In such cases, you might need to rely on the old saying, “water flows downhill.” Check your attic for any clues. A flashlight can be handy for this. Look for damp spots or possibly white salt deposits left by evaporated water.
READ: Water Damage Restoration Costs West Palm Beach – What You Need To Know
Safety First
Attics often have a thin sheet of plywood known as the “subfloor” laid atop ceiling joists, providing a platform to walk on. Make sure to only step on the stable framing pieces or the subfloor, never the insulation or the topside of the ceiling below.
The Water Test
In cases where the leak source isn’t readily apparent, you may need to enlist a helper. While you stay in the attic, let your helper spray the different areas from on top of your roof exterior using a water hose.
Start from the bottom and work your way up the roof. You can then look out for any trickling water inside to help identify the source. Be sure to communicate effectively with your helper to avoid causing water damage to the hose.
Never forget that roof work is inherently dangerous. If it rains heavily, or the roof is icy or steep, it might be best to call professionals such as Rescue Clean 911 and avoid the safety risks.
Moreover, if the leak proves elusive, locating it may require removing shingles or extensive roof probing, done best by a professional roofer.
Common Causes of Roof Leaks
Understanding what causes roof leaks helps Florida homeowners recognize obvious signs before minor issues escalate into major problems. Most leaks originate from predictable trouble spots that develop over time or appear suddenly after storm damage.
 Missing or Damaged Shingles
One of the most common causes of roof leaks involves missing or damaged shingles. Florida’s intense sun, combined with seasonal hurricanes and tropical storms, can cause shingles to crack, curl, or blow off entirely. When you notice missing or damaged shingles, water can seep directly through the exposed roof decking beneath.
During your exterior inspection, look for obvious signs like bare spots on your roof where shingles should be, or damaged shingles that appear cracked or warped.
After storm damage, it’s particularly important to check the entire roof for missing or damaged shingles that may have loosened during high winds. Even a single compromised shingle can allow water to penetrate, eventually rotting the roof decking and creating wet spots in your attic or ceiling.
READ: Why Do You Need Water Leak Remediation West Palm Beach
Flashing Failures
Flashing issues represent another primary source of most leaks in residential roofs. Step flashing, which protects the junction where your roof meets vertical surfaces like walls or chimneys, is particularly vulnerable to failure. Old flashing can deteriorate over time, developing rust, cracks, or gaps that permit water entry.
When inspecting for flashing issues, pay close attention to areas around chimneys, skylights, vents, and where the roof meets exterior walls. Look for obvious signs of rust, gaps, or sections where the old flashing has pulled away from the surface.
These flashing issues often manifest as dark spots on your ceiling near walls or wet spots that appear after rain. Installing new flashing is essential when the old material has deteriorated beyond simple repair—attempting to patch severely compromised old flashing rarely provides lasting protection.
Roof Valleys and Gutter Line Problems
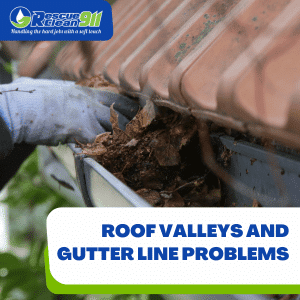 Roof valleys, where two roof planes intersect, naturally channel large volumes of water. If the valley’s step flashing or sealant fails, water can breach the roof decking.
Similarly, problems along the gutter line—whether from clogged gutters, ice dams, or damaged sections—can cause water to back up under shingles and into your home.
Florida homeowners should regularly inspect roof valleys and the gutter line for debris accumulation, which creates wet spots where water pools rather than drains.
Ice dams, while less common in South Florida than northern climates, can still form during rare cold snaps, forcing water under shingles and creating the exact location where leaks develop. Clear gutters and properly sealed roof valleys prevent most leaks originating from these vulnerable areas.
Damaged Roof Decking
The roof decking serves as the foundation beneath your shingles, and when it becomes compromised, the entire roof system suffers. Water that penetrates through missing or damaged shingles eventually saturates the roof decking, causing it to rot, warp, and lose structural integrity.
During attic inspections, examine the underside of your roof decking for dark spots, sagging areas, or visible rot. These obvious signs indicate that water has already compromised the structural layer.
Damaged roof decking cannot simply be patched. It requires removal and replacement of the affected sections. Ignoring compromised roof decking leads to more extensive damage, as the weakened structure provides inadequate support for roofing materials above.
READ: Bathroom Water Damage Repair Cost West Palm Beach
 Tools & Materials You’ll Need for Inside Roof Leak Repair
Before starting any interior roof repair, gather the right tools so the job is safe and effective. You’ll need a flashlight, putty knife, screwdriver, protective gloves, plastic roof covering, plywood, and roofing tar.
Keep roofing nails nearby in case structural support is needed, and ensure you also have enough nails for securing temporary materials. When the leak involves a missing or broken shingle, have a new shingle ready.
In cases where the surface needs sealing, you’ll need to apply roofing cement or tar as the primary sealant. These materials help seal cracks, fill gaps, close holes, and repair a small tear in the roofing surface — even during winter conditions when snow has contributed to the damage.
Safety Tips Before You Start
The first interior sign of a roof leak is typically a water stain on the ceiling. Once discovered, immediately turn off power in the damaged area if the leak is near electrical fixtures. Use protective gear and a stable ladder.
Water can enter the home through gaps around chimneys, vents, or window edges, especially if these gaps have widened over time. Inspect for wet insulation and address mold or mildew promptly.
If the ceiling begins to bulge, use a screwdriver to create a controlled drain. This helps stop water from spreading and prevent water from damaging the general area of the home.
READ: How Much Is Water Damage Inspection Cost West Palm Beach?
How to Contain Water Inside Your Home
Containment is critical before any repairs begin. Place buckets or tarps to catch drips and prevent interior damage. This step alone can stop water from soaking drywall and flooring and prevent water from reaching adjacent rooms.
If insulation is soaked, you should remove any insulation from the area where the leak is located to access the source of the leak. Clear wet insulation and monitor the repair after a rain to confirm the leak has been sealed.
Step-by-Step Guide: Fixing a Leaking Roof from the Inside
Locate the Leak
To locate the leak, look for water stains on ceilings or walls and trace them to their highest point. If you cannot find the leak visually, you can conduct a water test by having someone spray water on the roof while you look for signs of water entering the house.
Prepare the Area
Remove any insulation from the damaged area and ensure the surface is dry. If the damaged area is dry, you can proceed to seal the leak with roofing cement or a similar product.
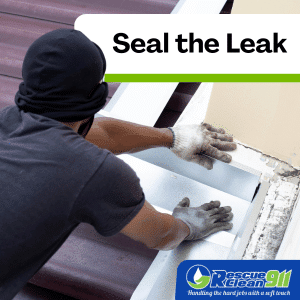 Seal the Leak
Use roofing cement or tar as the primary sealant for emergency patches. You can make a temporary patch to stop a leak using roofing tar, a putty knife, and a piece of plywood or plastic roof covering. Be sure to apply roofing cement generously and press the patch firmly in place.
Secure Materials
Reinforce the patch using roofing nails and additional nails if needed. This provides extra hold and prevents the patch from shifting.
Replace Materials if Needed
If the leak is caused by a damaged shingle or flashing, you may need to replace the damaged material. Install the new shingle carefully and seal around it with additional cement.
Finish & Inspect
Smooth excess sealant, ensure all holes are sealed, the surface is fully filled, and no new moisture appears.
Temporary Solutions for a Leaking Roof
Having identified the source of the leak in your roof, the next step involves temporary solutions to control the situation until a more permanent fix can be obtained. Addressing the problem with a temporary fix is like applying a band-aid—it keeps water out but isn’t a long-term solution.
Gathering Necessary Materials
To begin the process, you will need a few essential supplies, many of which you probably have around your house, or you can readily find at your local hardware store. You will need a putty knife, duct tape, a temporary roof patch, and roofing tar or roof sealant.
Applying a Temporary Patch
 To apply a temporary patch:
- Measure the size of the leak: Use a measuring tape to determine the size of the affected area that requires a temporary patch.
- Cut an appropriate-sized patch: Cut your roofing material to a size slightly larger than the measured area.
- Apply roofing tar: With your putty knife, spread a generous amount of roofing tar onto the leaking area of the roof.
- Place the patch over the tar: Next, position the temporary patch over the heavily tarred area.
- Add a second layer of tar: Then, apply another layer of tar on top of the patch.
- Seal edges: Use duct tape to seal the edges of the temporary patch.
Remember, the tarring process can be a bit messy, so make sure to keep some rags close to wipe off the excess tar from your putty knife and other surfaces.
READ: What Does Water Damage Look Like?
Using a Plastic Roof Covering
In situations where you have larger leak areas, you can utilize a plastic roof covering as a temporary fix. You can secure it over the leak using 2×4 wood strips nailed through the plastic and into the roof.
However, be aware that applying a tarp or plastic roof covering is an extremely temporary solution and is best used when dealing with a leak during long-lasting rain or wet conditions.
This method doesn’t repair the leak, but simply deflects the water, providing you more time before getting a proper repair.
What to Do After a Temporary Patch (Monitoring & Next Steps)
After sealing the leak, inspect for wet insulation and address mold or mildew. Clear wet insulation and monitor the repair after a rain. Look for new stains, dampness, or signs of moisture migration into the general area surrounding the repair.
How to Inspect Your Roof Safely
Before attempting any own repairs, proper inspection techniques and safety equipment are essential for protecting yourself while assessing roof damage.
Essential Safety Equipment for Roof Inspection
Never climb onto your roof without appropriate safety equipment. At minimum, you need:
 A sturdy, properly rated ladder that extends at least 3 feet above the roof edge
- Non-slip footwear with good traction
- Safety glasses to protect your eyes from debris
- Work gloves for hand protection
- A safety harness if working on steep slopes
Professional roofing companies use specialized safety equipment including fall arrest systems, roof anchors, and toe boards.
While homeowners performing quick inspections may not need this level of protection, using basic safety equipment is non-negotiable. Many homeowners underestimate roof dangers—even a single-story fall can result in serious injury.
If you’re uncomfortable with heights, if weather conditions are poor, or if your roof pitch exceeds a comfortable climbing angle, contact a roofing company rather than risking your safety.
Professional contractors have both the safety equipment and experience to work safely at heights that would endanger typical homeowners.
READ: Mold from Water Damage: What Is It and Why Is It There?
Interior Inspection: Finding Wet Spots and Dark Spots
 Begin your inspection inside your home, where obvious signs of leaks are often most visible. Check ceilings and upper walls throughout your house for dark spots, water stains, or active wet spots. Use a flashlight in dimly lit areas to reveal discoloration you might otherwise miss.
In your attic, look carefully at the underside of the roof decking for dark spots indicating water penetration. Trace any wet spots you find uphill—remember that water travels along roof decking and rafters before dripping down, so the exact location where you see interior damage may be several feet from where water actually enters the roof.
Listen for dripping sounds during and after rainfall, which can help pinpoint the exact location of active leaks. Many homeowners hear dripping sounds in their attic long before seeing visible water damage on ceilings below.
Exterior Inspection: What to Look For
When inspecting your roof’s exterior, systematically examine the entire roof surface, looking for obvious signs of damage:
- Missing or damaged shingles: Check for bare patches, cracked shingles, or areas where storm damage has removed protective covering
- Flashing issues: Inspect step flashing around chimneys, skylights, and wall junctions for gaps or rust
- Roof decking exposure: Look for any areas where roof decking is visible through missing shingles
- Gutter line problems: Check for sagging gutters, ice dam evidence, or debris blocking water flow
- Dark spots or staining: These visible indicators often reveal where water has breached the roof surface
Document any damaged shingles, flashing issues, or other problems you discover. Photos help when consulting with a roofing company about necessary repairs.
Long-Term Solutions: From Repairs to Roof Replacement
Even though temporary fixes can help in a pinch, they are by no means a permanent solution. Over time, small leaks can lead to more problems and cause extensive damage, not only to your roof but to your entire home.
or this reason, having your roof inspected and repaired by professionals who will employ the appropriate long-term solutions is important.
 Understanding the Roof Repair or Replacement Process
Repair or replacement involves complex procedures that require professional skills. For repair, this may mean replacing damaged or missing shingles, sealing with roof cement, or replacing parts of the roof with a new section. The application of roof cement or tar & gravel can help ensure a watertight seal.
If replacement is necessary, this means installing a whole new roof entirely, often changing the roof tiles or shingles. It’s vital to use the proper roofing materials to prevent future leaks and to endure heavy rainfall.
When to Call a Professional
All these tasks, from identifying the actual leak to procuring the materials and implementing a fix, are a lot for one person to handle. Plus, doing it wrong could result in further damage caused by standing water.
We can’t stress enough the importance of having your roof leak repaired by professionals. Trying a DIY long-term repair on a roof leak is a difficult process, and any repair error could lead to additional costs in fixing the mistakes or possibly even needing a total roof replacement.
If you’re not fully confident you can carry out the roof repair successfully and safely, or you continue to see water drip through your ceiling, that’s the cue to call a professional.
Contractors such as Rescue Clean 911 offer a wealth of experience and knowledge when it comes to long-lasting roof repair and replacement.
How Rescue Clean 911 Can Help With Your Leaky Roof
Roofs are a fundamental part of any home’s structural integrity, and a leaking roof can pose a significant threat, leading to further damage if not addressed promptly. Being proactive about roof leak repairs can save you a lot of money in the long run.
 Understanding Risk Factors and Potential Damage
Water leaks can cause a number of issues, ranging from mold and mildew to structural damage. Left unchecked, standing water can cause rotting in beams, increased moisture that boosts bug infestation, or develop into black mold, which carries severe health risks.
It’s worth noting that damage can also extend beyond the roof or the affected ceiling spot, damaging your walls, flooring, and sometimes even your property’s foundation. Moreover, the moisture can affect your home’s HVAC efficiency, inflating your energy bills.
Calling the Professionals at Rescue Clean 911
At Rescue Clean 911, we recognize the urgency and frustration that come with damage to your home. Our highly trained professionals are well-versed in emergency leak detection & repair, water damage remediation, and mold removal, giving you an all-in-one solution to your problems. Give us a call today!